Tynode

1.Dangers and Warnings
Failure to follow the instructions in this manual will not hold the manufacturer liable.
Any intervention on the product must be performed by a qualified person.
Product replacement must be done by a qualified person.
The device must be used according to the specifications in this documentation. Failure to do so may result in hazards.
No part of the device should be replaced or removed.
Turn off all power supplies before working on this device.
2.Homologations et conformités
EMC
- EN 61000-6-2 : Industrial environment immunity
- EN 61000-6-3 : Residential environment emissions
- EN 55022 : IT equipment immunity
Radio
- EN 300220
Sécurité
- EN 61010: Measuring device
The Tynode sensor is CE certified and RoHS compliant.
3.References
The TYNODE sensor is a LoRa® sensor that allows for various types of measurements. There are three versions available: temperature, pulse counting, and analog measurements.
Its wireless and long-range LoRa® communication mode, along with its simplified configuration, make the Tynode the ideal sensor for a wide range of measurements in industrial and commercial buildings.
Accessories
LITHIUM-BATTERY-AA
3.6V lithium battery in AA format. Capacity of 2.7 Ah.
Versions
TYNODE-DIGITAL
The TYNODE-DIGITAL LoRa® sensor is equipped with two digital inputs for dry contact.
TYNODE-PT100
The TYNODE-PT100 LoRa® sensor is equipped with 2 PT100 temperature probes for sleeve installation with a length of 3m.
TYNODE-ANALOG
The TYNODE-ANALOG LoRa® sensor is equipped with an analog input compatible with 0-10V and 4-20mA.
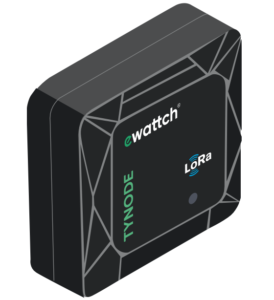
4.TYNODE Product Description
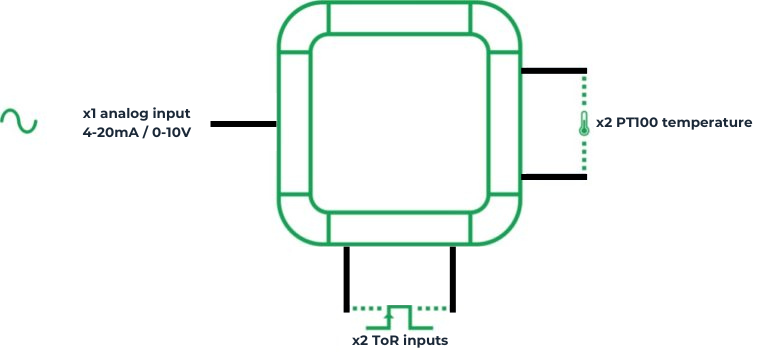
The TYNODE is a battery-operated LoRa® sensor, designed for easy positioning. There are three versions of the product available, depending on the measurements required. It can be equipped with 2 digital inputs, 2 remote PT100 temperature probes, or an analog input compatible with 0-10V or 4-20mA. Additionally, all versions are equipped with a magnetic contact detector.
The product comes in a standby state with its high-capacity lithium battery. Simply passing a magnet over the magnetic detector will activate the sensor.
The TYNODE sensor can be configured using the TYNODE Configurator software, which can be downloaded from the website http://www.ewattch.com/documentations-techniques/.
It allows for the configuration of transmission periods, radio communication parameters, network status, and sensor measurements.
The TYNODE is water-resistant and has an IP65 protection rating.
5.Description of Pulse Counting / Digital Input Measurement
The TYNODE sensor in its TYNODE-DIGITAL version allows for the reading of any type of pulse-emitting meters. It measures the number of pulses, the current state of the input, and the activation duration of the meter being monitored. The TYNODE-DIGITAL includes 2 inputs.
The measurement is performed using dry contacts. The maximum frequency is 10 Hz.
The configuration of this section is explained in the “Configuration” chapter.
6.Description of PT-100 Temperature Measurement
The TYNODE sensor in its TYNODE-PT100 version allows for temperature measurement using 2 PT100 3-wire probes.
The measurement range is from -100°C to 300°C.
The configuration of this section is explained in the “Configuration” chapter.
7.Description of 0-10V or 4-20mA Analog Measurement
he TYNODE sensor in its TYNODE-ANALOG version allows for the measurement of an analog signal in the range of 4-20mA or 0-10V. This can include measurements such as flow rate, pressure, or level.
The resolution of the analog measurement is 10uA or 10mV, with an accuracy of +/- 50uA or 25mV. The TYNODE-ANALOG has 1 analog input.
This configuration is explained in the “Configuration” chapter.
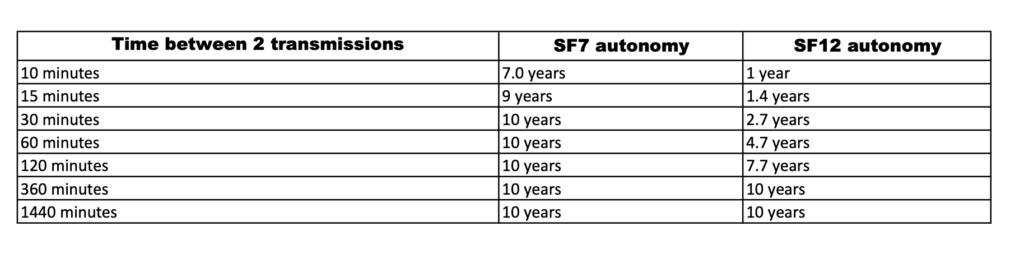
8.Autonomy
9.Product Installation
Sensor installation
This equipment can be installed:
- Using double-sided adhesive
- Screwed to the wall
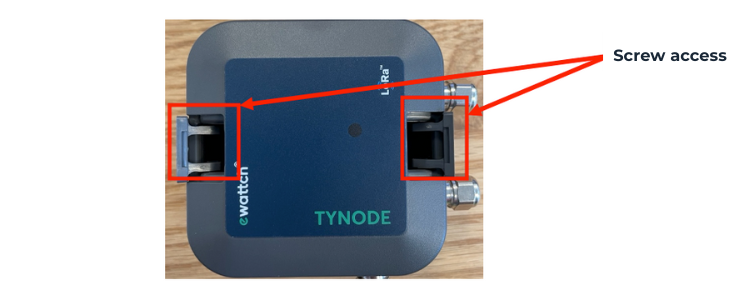
To simplify its installation, the Tynode has two flaps that provide access to the back of the Tynode for screwing it without having to open the enclosure.
Description of the Interior of the Sensor
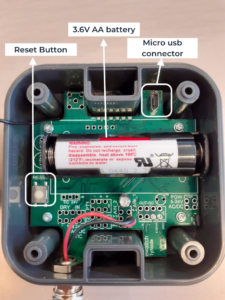
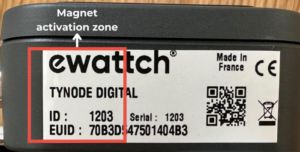
Activating the Sensor with Magnet or Reset Button
By default, the sensor is in sleep mode to conserve battery power. To wake it up from sleep mode, you can place a magnet in the designated area below for 5 seconds. The LED of the product will blink and then remain steady to indicate that the product is starting.
Alternatively, you can press the reset button inside the product to start it.
10.Configuration
Connecting to the Software
The Tynode can be configured using the Tynode Configurator, a configuration software that can be downloaded from the website: ewattch-documentation.com.
This software allows you to configure transmission periods, radio communication settings, and view the network status and sensor measurements.
The Tynode Configurator has a “Simple” mode and an “Advanced” mode. This section describes its usage and configuration in the “Advanced” mode.
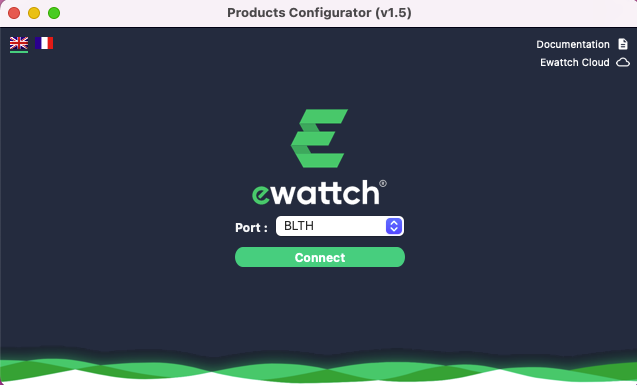
Connection
- Start the software on your computer. When using the software for the first time, you may have to accept the opening of the software in your PC’s “System Preferences”.
- Open the Tynode case and connect it to your PC via a micro-USB cable.
- Switch on the Tynode using the magnet.
- Select the usb port corresponding to the Tynode, then click on the “Connect to product” button. Note that if too much time elapses between activating your Tynode and connecting it to the software, an automatic sleep mode may occur.
- You are now on the main page of the configuration software
- Here, you can see the different modules available, depending on the version of your Tynode (refer to the “References” section for details).
Home Screen
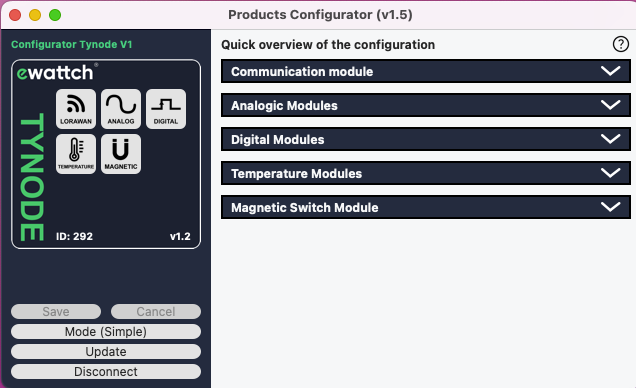
On the home screen, at the bottom left, you will find the initial functionalities of the software:
- Save: This button allows you to save the changes you make to your Tynode’s configuration. The configuration software allows you to modify all the parameters of your choice at once, and you only need to validate the changes by clicking “Save.”
- Therefore, you don’t need to click this button after every change. Undo: This button allows you to undo the modifications you made to your Tynode’s configuration.
- Simple Mode: This button allows you to choose and potentially switch between the simple mode and advanced mode.
- Update Product: This button provides access to the product update menu.
- Disconnect Product: This button safely disconnects the USB cable from your Tynode.
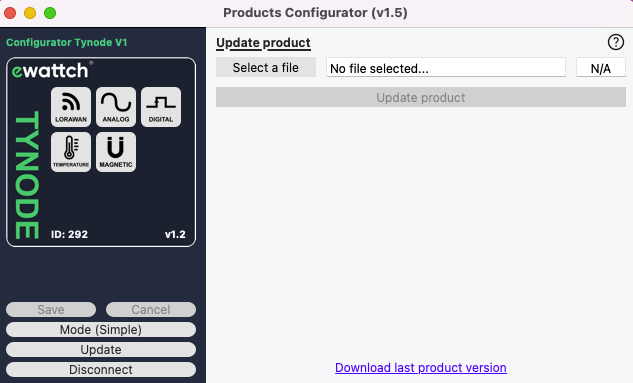
Update
From the same home screen, you also have access to the option to update your sensor. To perform the update:
- Download the update file from ewattch-documentation.com
- Click on the “Update Product” button at the bottom left.
- Load the update file into the software by clicking the “Choose a file” button.
- Click the “Update Product” button to initiate the update.
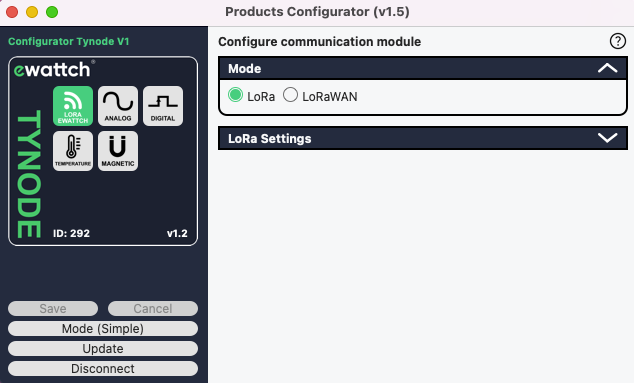
Radio configuration
The icon with the radio symbol, the first icon at the top left, allows you to configure the radio settings of the Tynode.
Two communication modes are available:
LoRa®: Communication with the following LoRa EWATTCH gateways: Toolbox or Tyness 4G
LoRaWAN™: LoRaWAN™ communication on private or operated networks.
If you choose the LoRa® communication mode, you will have access to an additional tab titled “LoRa Settings,” where you can define the channel on which your sensor should communicate, as well as its communication power:
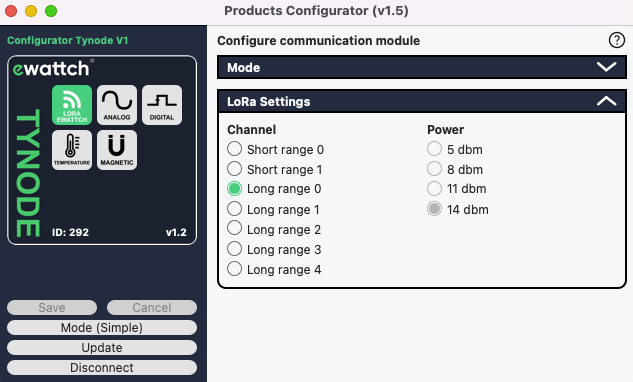
In LoRa® mode (LoRa®-Ewattch), the Tynode has several LoRa® communication channels:
2 channels for close interval transmissions,
5 “long-range” channels for transmissions over very long distances.
For two products to communicate with each other, you need to select the same communication channel on both products.
If you choose the LoRaWAN™ communication mode, you will have access to different keys and configuration options, allowing you to set up your Tynode:
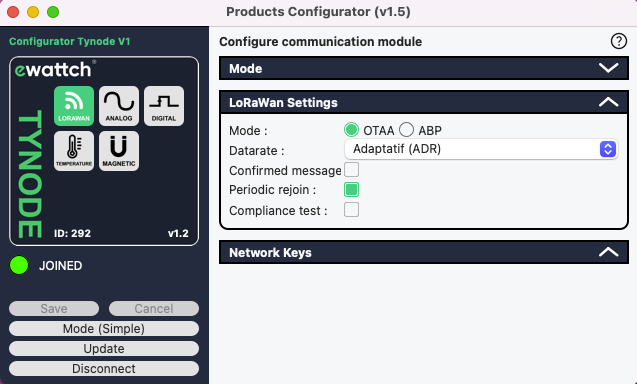
LoRaWAN network connection mode: OTAA or ABP. OTAA mode is recommended.
OTAA mode settings:
- Data rate: By default, the “Adaptive (ADR)” option is selected. With this option, your sensor will automatically adapt its transmission rate to use the highest possible rate for communication. This helps conserve the battery life. Alternatively, you can manually specify the communication rate your sensor should use, ranging from SF12 (long range, low speed) to SF7 (short range, high speed).
- Confirmation message: Check this box to receive a confirmation of reception from the network for each message sent by the sensor. For bandwidth and battery saving reasons, this box is generally not checked. Do not use with transmission intervals less than 1 hour!
- Periodic rejoin: Check this box for your Tynode to renew its network connection every week. This is particularly useful in terms of data security, as the encryption keys are renewed in the process.
- Compliance testing: This option is only useful for testing laboratories.
Keys of the OTAA mode: :
The following keys will be required when configuring the product on your LoRaWAN network:
- EUID (= DEV EUI): This is a unique identifier for each object, programmed at the factory.
- APP EUI: This is the application identifier of the product.
- APP KEY: This is the application key of the product.

Parameters of the ABP mode :
- Data rate: By default, the “Adaptive (ADR)” option is selected. With this option, your sensor will automatically adapt its transmission rate to use the highest possible rate for communication. This helps conserve the battery life. Alternatively, you can manually specify the communication rate your sensor should use, ranging from SF12 (long range, low speed) to SF7 (short range, high speed)
- Confirmation message: Check this box to receive a confirmation of reception from the network for each message sent by the sensor. For bandwidth and battery saving reasons, this box is generally not checked. Do not use with transmission intervals less than 1 hour!
Keys of the ABP mode:
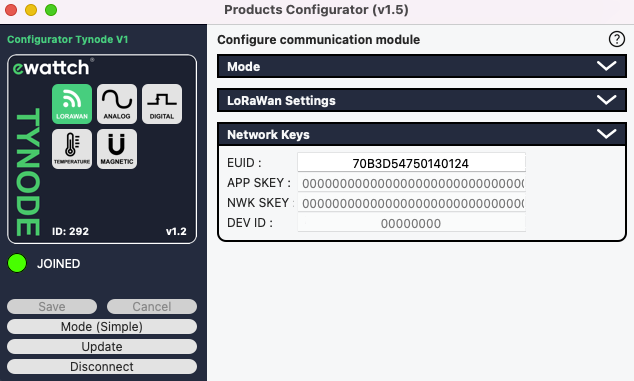
The following keys will be required when configuring the product on your LoRaWAN network:
- EUID: This is a unique identifier for each object, programmed at the factory.
- NWK SKEY: One of the network session keys.
- APP SKEY: One of the network session keys.
- DEV ID: Product identifier on the network.
Analog Module:
In the case of a TYNODE-ANALOG, there are two panels dedicated to configuring this analog section.
The first panel allows you to determine the frequency at which the TYNODE should transmit its data over the radio.
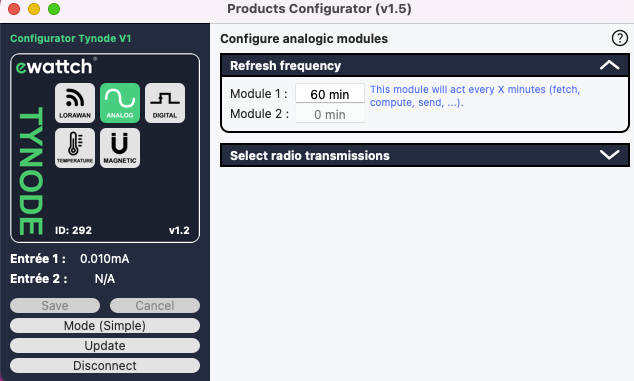
The second panel allows you to enable or disable the available analog inputs and, more importantly, determine the mode in which the input should operate: in 4-20mA mode via the “mA” button or in 0-10V mode via the “V” button.
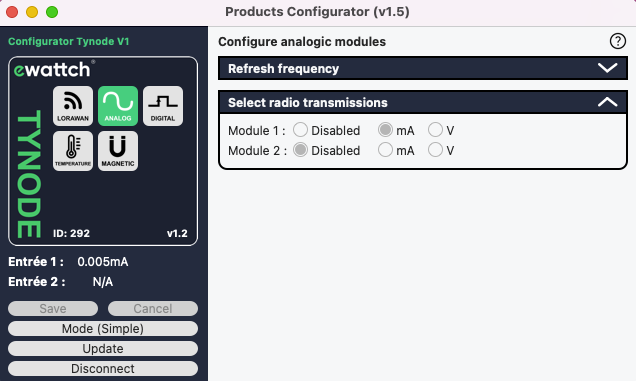
Finally, you have the option to see real-time measurements from the sensor in the left column, under the “TYNODE” frame (= “Module 1” and “Module 2”).
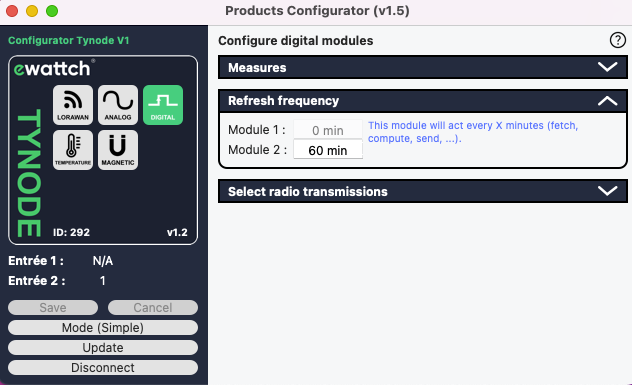
Digital Module:
In the case of a TYNODE-DIGITAL, there are three panels dedicated to configuring this digital section.
The first panel allows you to view the data collected by each of the two sensor inputs in real-time.
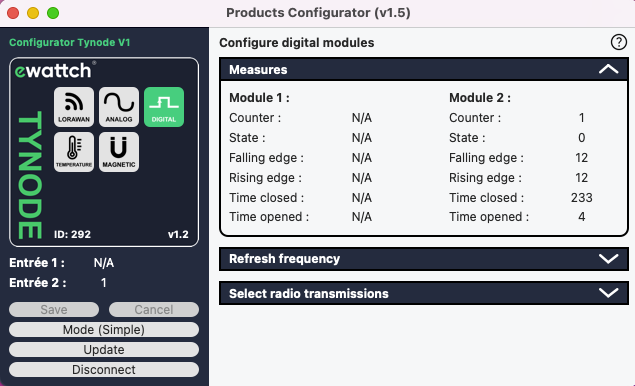
The second panel allows you to configure the two available inputs: you can choose the frequency at which the TYNODE should transmit its data over the radio.
The third and final panel allows you to go further in the configuration. In addition to enabling or disabling the inputs, you can measure the cumulative state time, the time spent in the last state, and count the number of edges.
The cumulative state time, if enabled, allows you to count the total time the counter or the measured object has been in an open or closed state, depending on the chosen option.
The time spent in the last state, if enabled, allows you to measure the duration of the last open or closed state.
The edge counter allows you to count the number of times an impulse has occurred. This counting can be done on either a rising or falling edge.
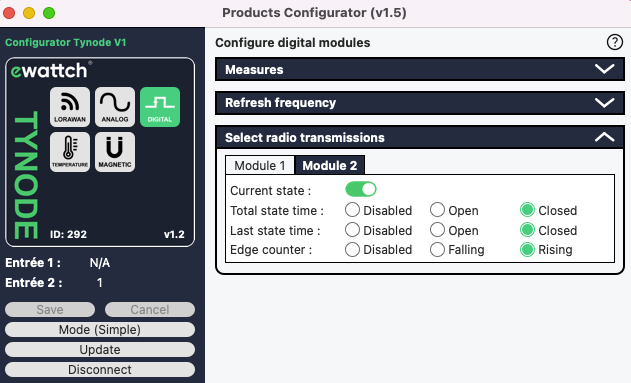
Finally, you can see in the left column, under the “TYNODE” section, the real-time data collected by the sensor (“Module 1” and “Module 2”).
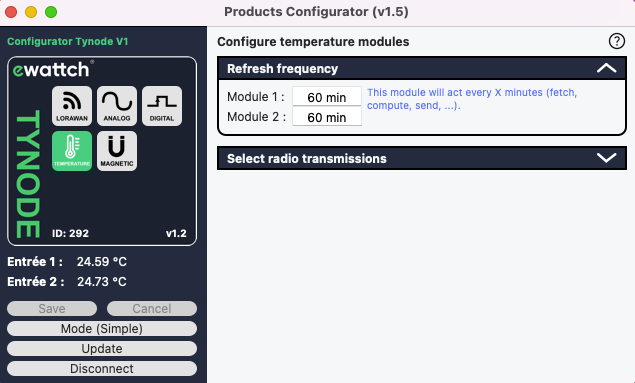
Temperature Module:
For the TYNODE-PT100, there are two dedicated panels for configuring the temperature section.
The first panel allows you to define the frequency at which the TYNODE should transmit its data via radio.
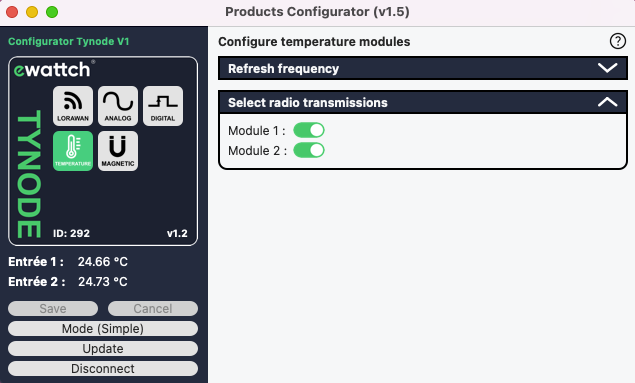
The second panel allows you to enable or disable the temperature inputs available to you.
Lastly, you can directly observe the sensor measurements in the left column, under the “TYNODE” frame (“Module 1” and “Module 2”).
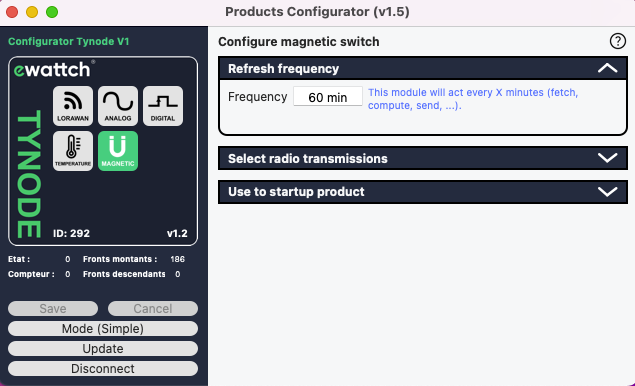
Magnetic Switch Module:
For the Magnetic Switch, there are three dedicated panels for configuring this magnetic section.
The first panel allows you to determine the frequency at which the sensor should transmit its data via radio.
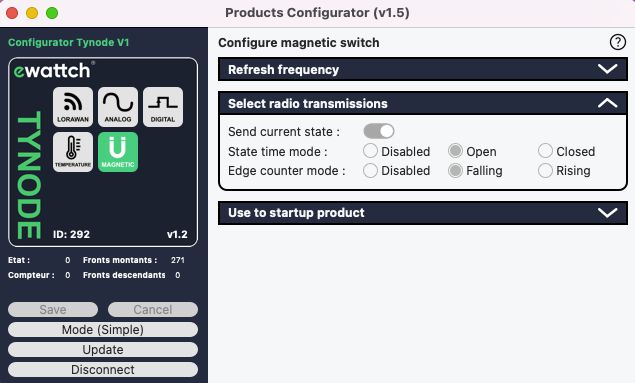
The second panel allows you to configure the state duration mode and front counter (refer to the section on TYNODE-DIGITAL above for more details on these features).
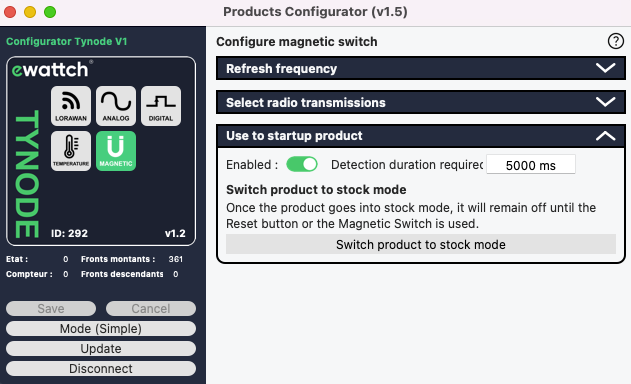
The third and final panel allows you to configure whether the magnetic switch is used to start the product (using a magnet passing over the edge of the sensor) and decide if your product should be put into stock mode to conserve its battery.
When you have finished configuring your device, click on the “Save” button (in the left column) and then on “Disconnect the product”.
You can then unplug the USB cable from your computer and the Tynode and close the configuration software.
11.Default Settings
- Radio Communication: LoRaWAN
- LoRaWAN Mode: OTAA
- ADR: enabled
- Confirmed Messages: disabled
- Periodic reconnection to LoRaWAN network: disabled
- Time between two radio transmissions of measurements: 60 minutes
- Product activation by magnet: enabled
- Digital input measurements: counting rising edges only
12.Radio Communication
The TYNODE sensor transmits its data in a raw format on public and private LoRaWAN™ networks and on the LoraEwattch network. To obtain documentation on how to decode the frames (Payload) sent by the TYNODE, please contact us directly.
13.Technical Specifications
POWER SUPPLY
- Voltage : 1x 3.6V replaceable battery (2700mAh) included with the sensor
- Battery Life : Up to 10 years depending on the measurement reporting frequency
- Total Battery Capacity : 2.7 Ah
MEASUREMENTS
Note: Measurements taken outside the recommended conditions listed below may damage the product.
Digital Measurement
Number of channels : 2
Maximum Frequency : 10Hz
Imposed Voltage : 3,3V
Minimal Off time : 80ms
Minimal On Time : 20ms
Temperature Measurement (PT100)
Number of Probes: 2
Operating Temperature: -100°C to +300°C
Accuracy : +/-0,5°c
Resolution : 0,01°c
Cable Length: 3m
Probe Format: 8mm sleeve probes
Analog Measurement
Number of Channels: 1
Mode: 4-20mA or 0-10V
4-20mA Input:
- Maintain a signal >1mA and <20.5mA to avoid signal loss
- Resolution: 0.01mA
- Accuracy: +/- 50µA
0-10V Input:
- Maintain a signal <10.5V to stay within the signal reporting range
- Resolution: 10mV
- Accuracy: +/- 25mV
RADIO COMMUNICATION
LoRaWAN™
- Type : Wireless
- Frequency : 868MHz
- Unique Serial Number: yes
- Maximum Transmission Power: 25mW
- Communication Range: Up to 15km in free-field conditions
- Version : 1.0.1
- Class: A
ENVIRONMENTAL CONDITIONS
- Operating Temperature: -25°c to +70°c
- Protection Rating: IP 65
- Maximum Altitude: 2000 meters
- Power Supply Voltage Fluctuation: ±10% of nominal voltage
PHYSICAL CHARACTERISTICS
- Dimensions (H X W X D) : 75 x 75 x 35 mm
- Housing Material: ABS
- Weight: 272g (without battery) ; 288g (with battery)
- Protection Rating: IP 65
