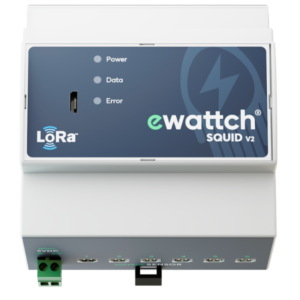
SQUID V2

1.Dangers and Warnings
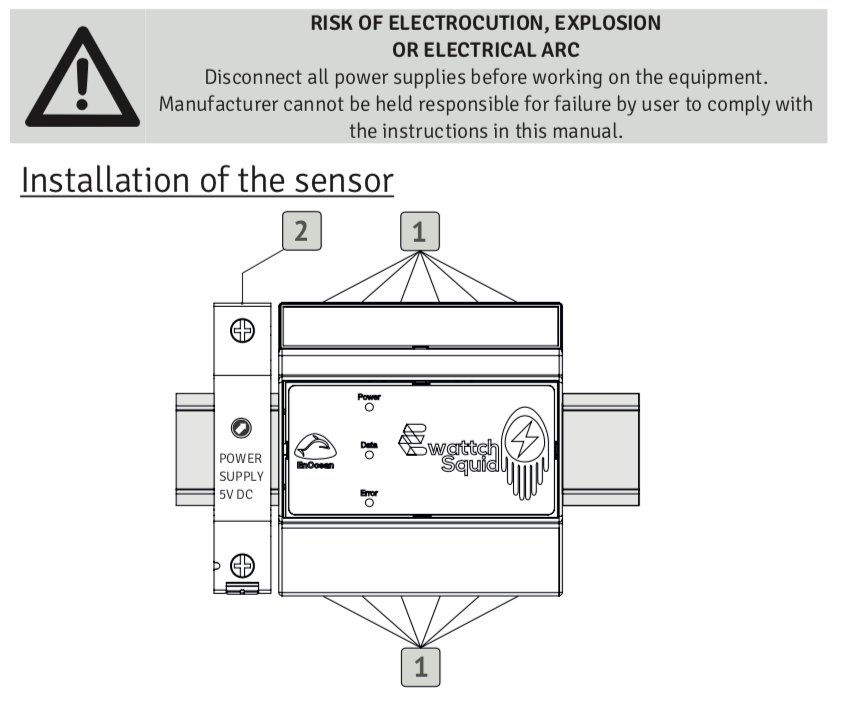
Manufacturer is not responsible for user’s failure to comply with the instructions contained in this manual.
Any service performed on this product must be completed by a qualified individual.
Replacement of this product must be performed by a qualified individual.
Failure to use this equipment in accordance with the specifications in this documentation could lead to a hazard.
No parts in this device should be replaced or removed.
Disconnect all power supplies before servicing this device.
2.Homologations and Conformities
EMC
- EN 61000-6-2 : Immunity for industrial environment
- EN 61000-6-3 : Emission for residential environment
- EN 55022 : IT equipment immunity
Radio
- EN 300220
Safety
- EN 61010 : IT equipment
3.References
SQUID :
SQUID V2 in LoRaWAN™ version (by default) or Lora Ewattch version allowing measurement of currents up to 600A.
KIT-SQUID :
Kit including the SQUID V2 sensor and all necessary accessories: a power supply with rail din 230VAC-5VDC mounting (ref: ALIM-RAIL-5V) and a magnetic antenna for mounting outside the cabinet (ref: ANTMAGNSUP). Possibility of power supply via mains adapter upon request (ref: ALIM-BLOC-5V).
Accessories :
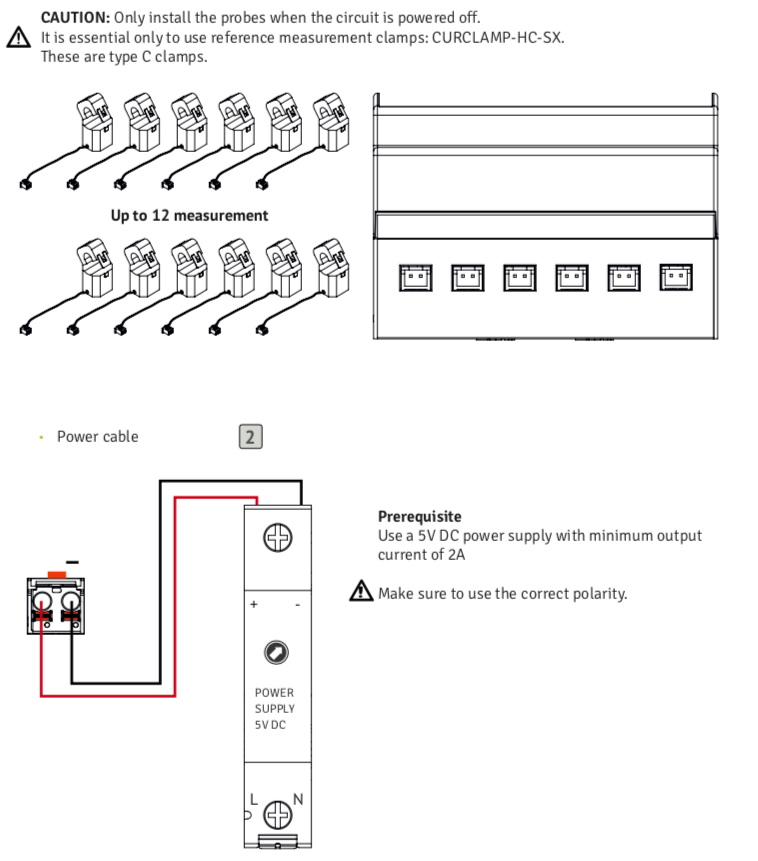
CURCLAMP-HC-S1
Measurement clamps for SQUID-HC – Ø10mm – 75A eff max
CURCLAMP-HC-S2
Measurement clamps for SQUID-HC – Ø16mm – 100A eff max
CURCLAMP-HC-S3
Measurement clamps for SQUID-HC – Ø24mm – 300A eff max
CURCLAMP-HC-S4
Measurement clamps for SQUID-HC – Ø36mm – 600A eff max
ANTMAGNSUP
Antenna with magnetic base. Cable length: 4m.
ALIM-RAIL-5V
230VAC – 5VDC power supply with din rail mounting
ALIM-BLOC-5V
230VAC – 5VDC power supply of block type. Cable length: 1.1m.
4.Presentation
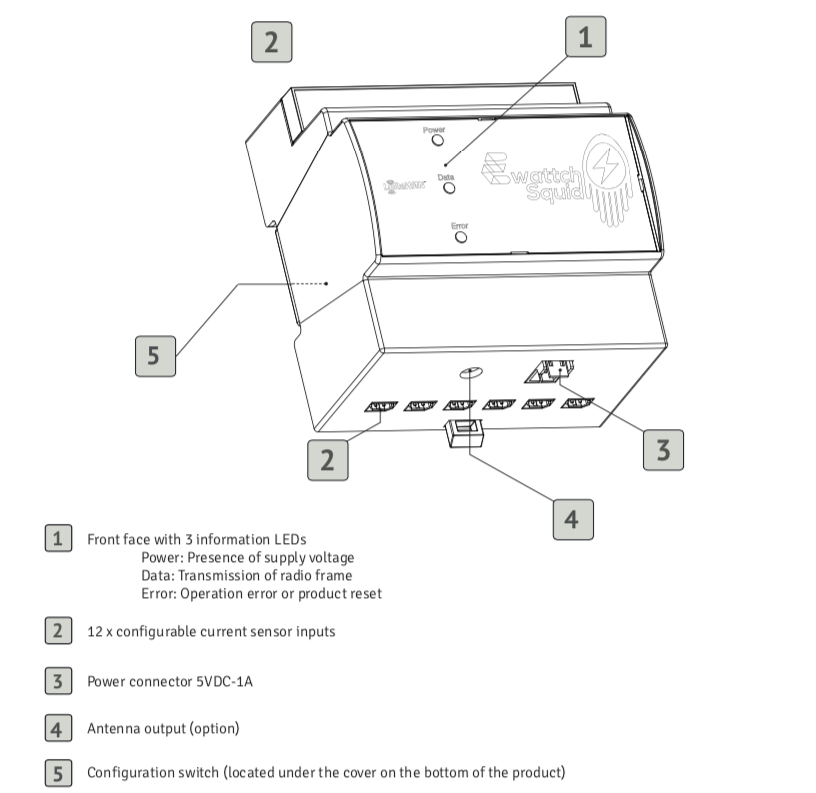
5.The product description
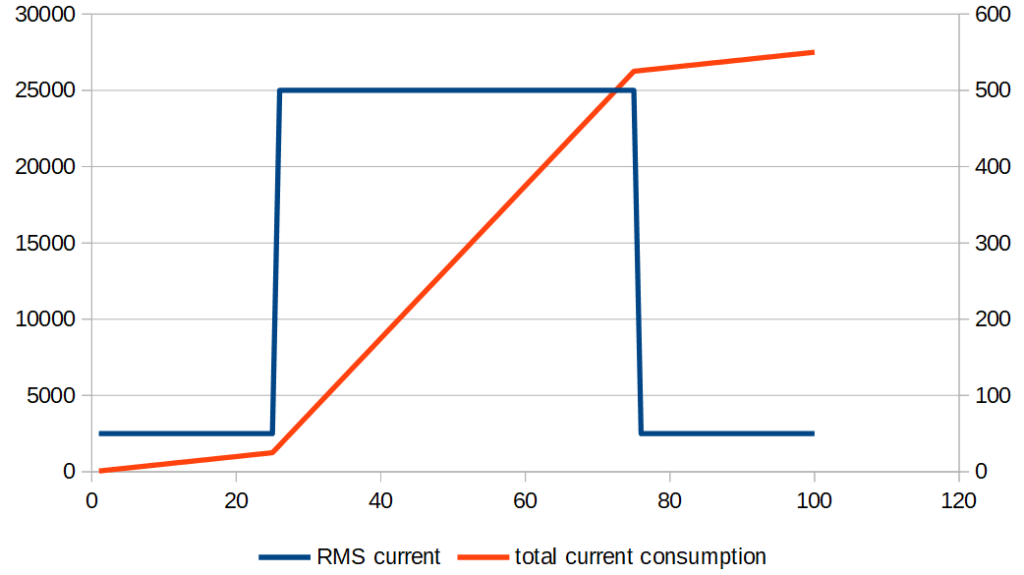
The SQUID V2 is a sensor equipped with 12 current measuring clamps, which sends the measured current values via a LoRaWAN or Lora Ewattch wireless link. The product sends consumption values in Ah (in orange on the graph below) of the 12 clamps at a configurable interval.
The SQUID is powered by a 5V DC external power supply.
6.Installation of the product
Mounting and Disassembly
This equipment must be installed on a horizontal DIN rail of 35mm in the electrical panel. Be sure to lock the product securely onto the DIN rail.
Allow a space of 5 modules to install the product in the electrical panel. To disassemble, use a flat screwdriver to unlock the black clip at the bottom of the device.
Prerequisites
A 5V DC-2A power supply must be used to power the SQUID. The wiring of the Safety Extra Low Voltage circuits must be maintained and kept separated from circuits carrying hazardous voltages.
- Connecting the current sensors

Connect the measurement probes to the 12 connectors on the top and bottom of the device.
7.Radio communication
Procedure for connecting to the network
- Our products attempt to connect to the network upon startup.
- If this does not work, they will retry every 24 hours until successful.
Periodic reconnection to the network
- Our products initiate a network connection procedure every 7 days. These reconnections improve security. Indeed, reconnecting to the network renews encryption keys.
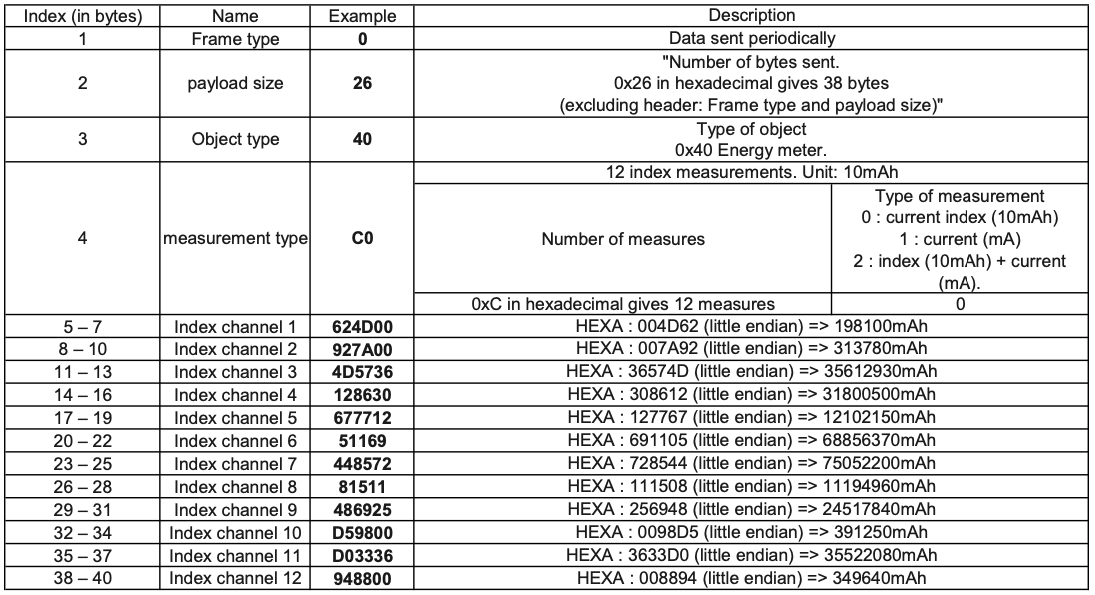
Description of payloads
The SQUID-LoRaWAN™ transmits its data in a raw format on various public and private LoRaWAN™ networks. The section below shows how to decode the frames (PayLoad) sent by the SQUID V2.
Periodic frames
A payload decoder is available at the following link: https://ewattch-documentation.com/?page_id=3439
Periodic frames contain the data measured by the SQUID V2.
Example of transmitted periodic frame (HEXA):
8.Product Configuration
Two configurations are available:
LoRaWAN™ mode
The SQUID V2 periodically sends current measurements from its 12 measurement probes, in the form of consumption values(Ah), via a LoRaWAN radio link. To configure a SQUID V2 on a LoRaWAN network, you must use the following codes:
- DevEUI: This is a factory-programmed identifier that makes each object unique and is indicated on the label of each product. Example: 70B3D54750120168
- As well as the two codes AppEUI and AppKey provided with the sensors when you order.
These keys can be found in the email with the product keys, which is sent to you when your order is shipped, or in the Squid configuration software (see below).
LoRa Ewattch mode
The SQUID V2 periodically sends current measurements from its 12 measurement probes, in the form of consumption values(Ah), via a Lora Ewattch radio link.
To connect the SQUID V2 to the private Lora Ewattch network, simply configure the SQUID V2 in Lora mode and on the same communication channel as the concentrator (Toolbox or Tyness 4G) to which it will send its data.
The SQUID V2 will automatically search for devices in its vicinity that are on the same communication channel as itself.
Here is how to configure your Squid V2 according to your preferences, via the configuration software:
Implementation
- Download the configuration software, available in the “Downloads” section of the technical documentation.
- Run the program (no installation required, available on Windows 8 or higher and Apple computers).
- Connect your computer to the miniUSB input on the front of the device, using a MiniUSB cable. Note: some USB cables only allow charging of mobile devices such as phones, and may not connect to a computer.
- Power up the Squid V2: a new communication port will appear in the “Serial Port” dropdown menu. Select it.
- Click on the “Connect” button. You will arrive at the main page of the Squid Configurator.
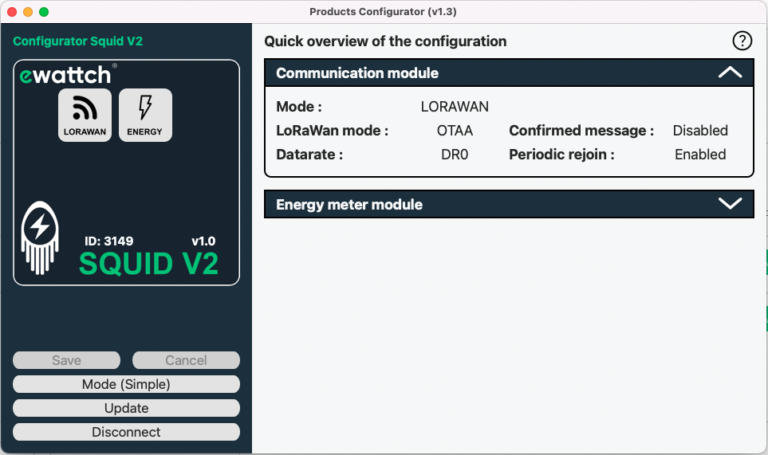
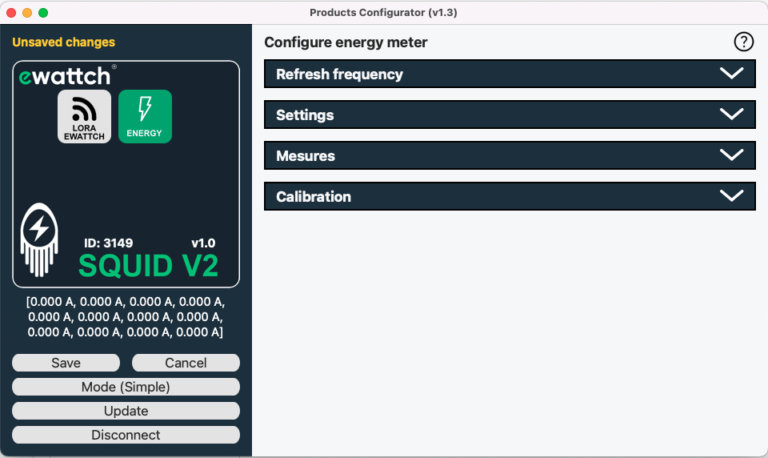
Main page
The main page gives you access to several functionalities and basic informations about the configuration of your Squid V2:
- In the top left corner, in the “Squid V2” box, the first gray box allows you to know directly in which communication mode the Squid V2 is currently in (here: LoRaWAN mode, which is the default mode).
- Next to it, the “Energy” box allows you to consult the parameters related to energy measurements. We will come back to this later.
- At the bottom left, there are also several buttons:
- “Save”: to confirm the modifications made to the configuration of your Squid V2.
- “Cancel”: to cancel the modifications made to the configuration of your Squid V2.
- “Mode (Simple/Advanced)”: to change the configuration mode of your Squid V2. Generally, the “Simple” mode will be more than enough.
- “Update”: to update your Squid. (See below)
- “Disconnect”: to disconnect your product before removing the USB cable.
- On the right, you have access to two panels: “Communication module” and “Energy Meter module”.
- “The Communication module” will inform you about the main parameters related to the communication of your Squid V2:

-
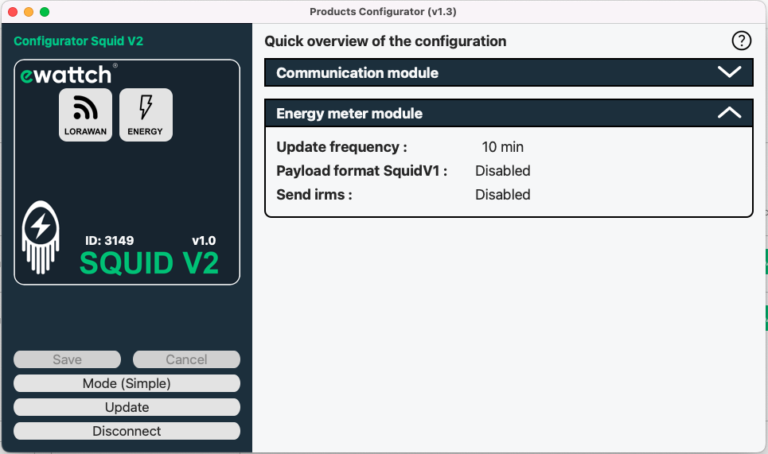
- “The “Energy Meter module” will provide you with the main settings related to the measurements of your Squid V2:
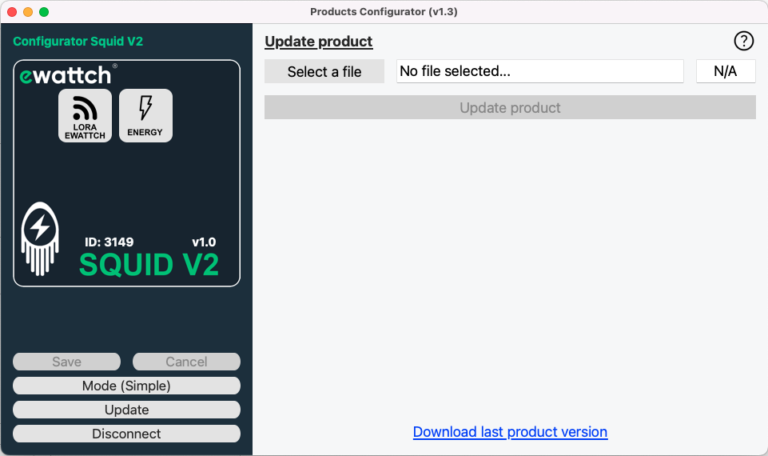
Update
An update of your Squid V2 may be necessary and is recommended, as our products are constantly evolving.
To do this, first go to the technical documentation to download the update file, to be imported into the configuration software.
Then, click on the “Update” button at the bottom left and then on “Select a file”.
Choose the update file that you just downloaded from the technical documentation.
Click on “Update product” to start the update. A window will appear to let you know that the update is complete.
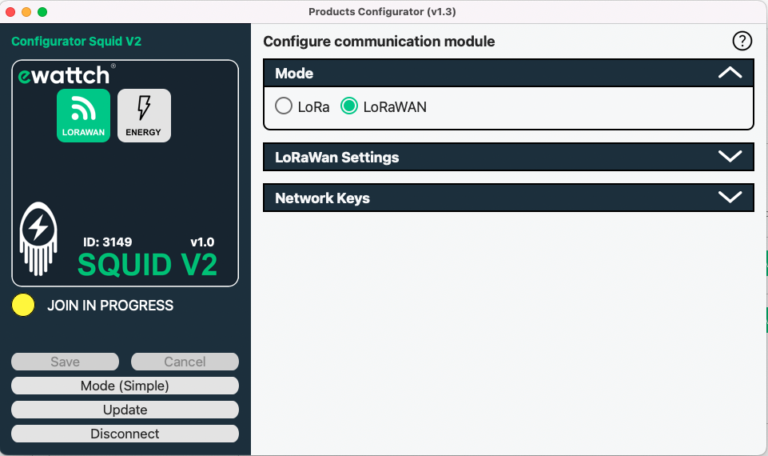
LoraWan Configuration
To configure your Squid V2 in LoraWan mode, click on the box in the top left corner, symbolizing radio communication (green box in the image below).
Then, open the “Mode” panel (1st panel) and check the “LoRaWAN” option.
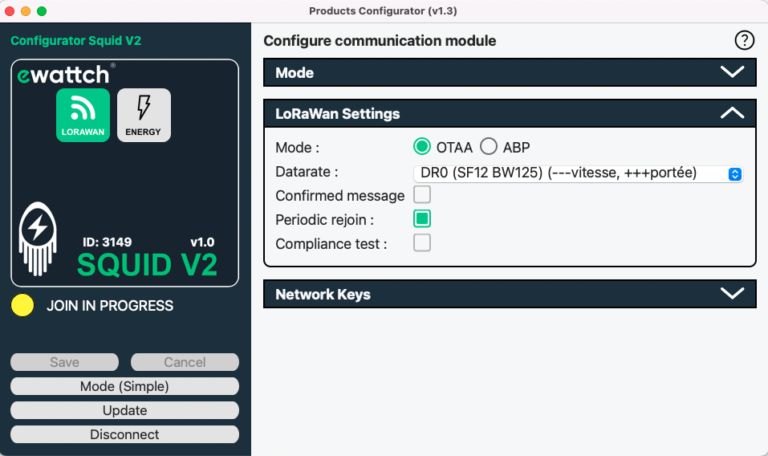
The second panel “LoRaWan Settings” allows you to:
- Adjust the LoRaWAN communication mode (OTAA or ABP);
- Adjust the datarate;
- Choose whether or not you want to receive a confirmation of successful data transmission (“Confirmed message”);
- Choose whether you want the Squid V2 to automatically restart a connection procedure every 7 days, which is ideal for the security of your data (“Periodic Rejoin”).”
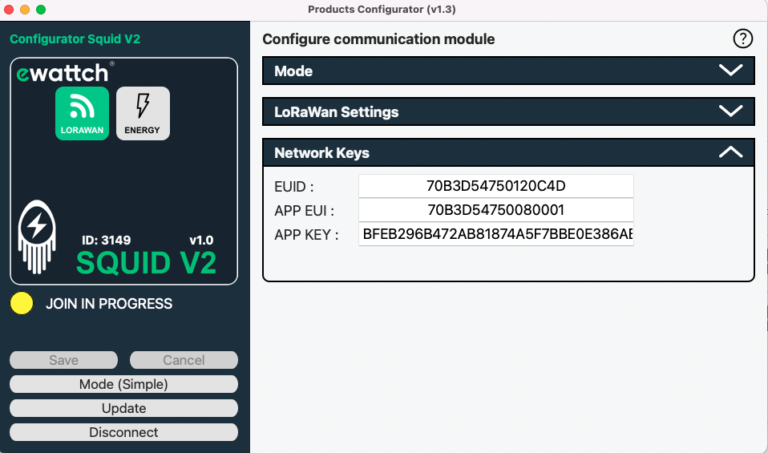
The third panel “Network Keys” gives you access to the keys of your Squid V2, which are necessary for the proper provisioning of your Squid V2 on a LoRaWAN network (private or public).
Lora Ewattch Configuration
To configure your Squid V2 in LoRa mode, click on the radio communication icon in the top left corner (green box in the image below).
Then open the “Mode” panel (first panel) and check the “LoRa” option.
The second panel “LoRa Settings” allows you to define on which channel and with which power your Squid should try to communicate.

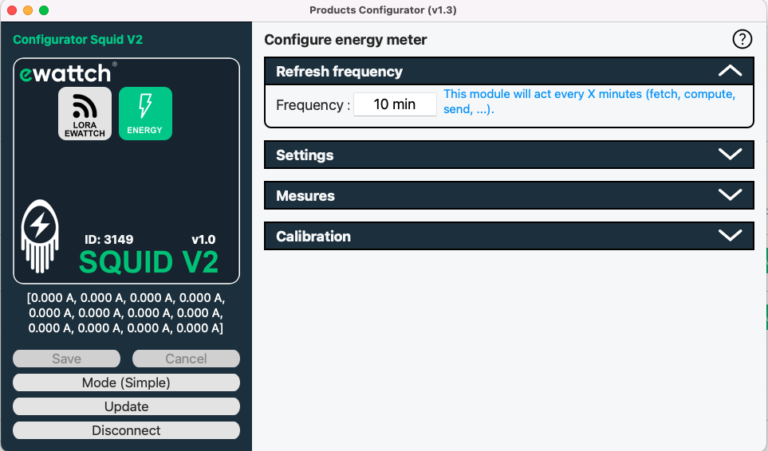
Energy parameter configuration
To access the configuration parameters for the measurements of your Squid, click on the energy icon in the top left corner (green box in the ima ge below).
The first panel “Refresh frequency” allows you to set the granularity of radio transmission of measurements from your Squid V2. By default, this is set to 10 minutes.
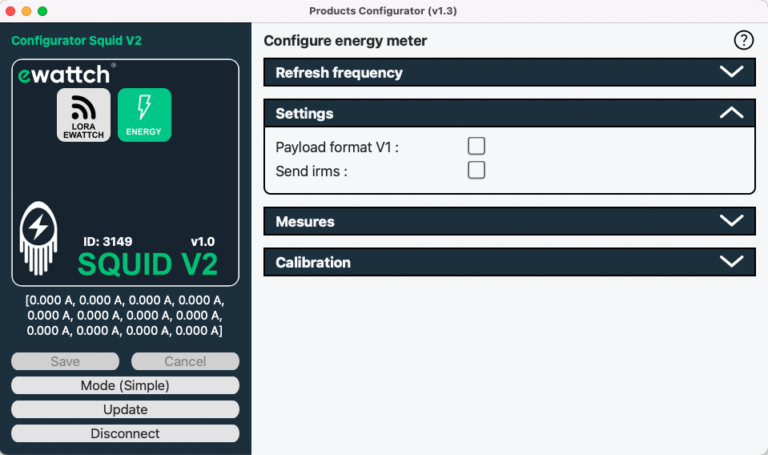
The second panel “Settings” allows you to configure the type of data transmission: V1 format or not (to keep the same message format as the Squid V1), and the transmission of instantaneous measurement (check “Send irms”). By default, these two boxes are not checked.
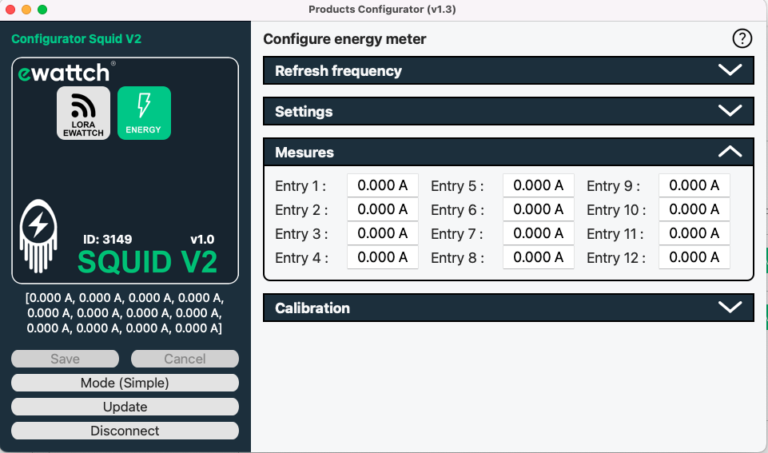
The third panel “Measurements” allows you to view in real-time the measurements taken by your Squid.
When you have finished your configurations, don’t forget to click on the “Save” box in the left column to save all your changes. Otherwise, they will be lost.
Click on “Disconnect” in the bottom left corner to properly disconnect the Squid.
9.Default parameters
- Radio communication: LoRaWan
- LoRaWan mode: OTAA
- datarate: Fixed DR0/SF12
- Messages confirmed: deactivated
- Periodic reconnection to the LoRawan network: deactivated
- Time between two radio communication of mesures: 10 minutes
- Measurement: 12 measurement channels with measures in mAh
10.Technical Specifications
POWER SUPPLY
- Voltage : 5 VDC
- Maximum consumption : 0,5A
- Power supply voltage fluctuation : +- 10% of the nominal voltage
CONNECTIONS
Current clamp inputs
- Number of inputs : 12 independent channels for current clamps
- Available clamps : 4 different sizes (10, 16, 24, and 36 mm)
- Clamp type : split core current transformer
- Clamp cable length : 2m
- Maximum current : 75A – 100A – 300A – 600A
- Accuracy : +- 2% from 1A.
- Resolution : 10mAh
- Sampling : 7,8Khz
- Bandwidth : 0-3,6Khz at -3db
Antenna
- Type of connector : female SMA
- Resistance : 50 ohms
- Frequency : 868 MHz
- Remote antenna : Yes
RADIO COMMUNICATION
LoRaWAN™:
- Frequency : 868MHz
- Maximum transmission power : 25mW
- Communication distance : up to 15km in open field
- Version : 1.0.1
- Class : A
- Micro USB configuration software : Yes
ENVIRONMENTAL CONDITIONS
- Operating environment : indoor (IP20)
- Operating temperature : from 5 to 60°C
- Storage temperature : from -20°C to +70°C
- Operating humidity : 10 to 80%, without condensation
- Storage humidity : 10 to 80%, without condensation
- Maximum altitude : 2000 m
- Power supply voltage fluctuation : +-10% of nominal voltage
- Pollution degree : 2
- Overvoltage category : III
PHYSICAL CHARACTERISTICS
- Dimensions (H X L X W) : 90 x 88 x 62 mm
- Size : 5 modules
- Weight : 152 g
- Mounting : DIN EN 6 0715 rail (1 x 35 mm)
CERTIFICATIONS
- CE Certification : YES
11.Contact

13, Rue Maurice Jeandon
88100 Saint-Dié des Vosges
FRANCE
sales@ewattch.fr
www.ewattch.com